
There is number of reasons one would want to use fully fledged database engine as a storage to log amateur radio QSOs. This article is showing step by step how to setup MariaDB (or MySQL) database and migrate existing QSO log in Log4OM – popular software for logging ham radio correspondence.
Why to bother?
For most cases, especially when used on single computer, the default SQLite is more than enough to handle any (reasonable) number of QSO you may want to store using Log4OM. Even tens of thousands of entries can be handled by SQLite.
However, there are cases when using “proper” database is a viable choice, in example:
- Handle logs from multiple Log4OM instances (including from different accounts on the same computer, or from different computers). Especially sharing SQLite database file using popular public cloud based services (like OneDrive, Google drive, Dropbox, etc.) may lead to data corruption. These services are not aware of SQLite state and may override its files in a wrong moment, or create file duplicates (i.e. when data file is modified on one computer, not synced, and modified again on different computer – in such a case network drive engine will have two versions of the file and will be unable to properly sync them).
- During amateur radio contests, to log all QSOs into one, centralised database, even from many contest radio stations in the same time.
- Already having up and running MariaDB/MySQL database engine, with good backup schema, running on reliable server. In such a case adding yet another database is simple and logical step.
- Access Log4OM database from remote places, i.e. during POTA activations. Remote access may be huge advantage, removing the need of consolidating QSO logs after returning to the base station. Remote connectivity may be not available everywhere however, as it will be relaying on the Internet access (assuming remote database is available as public cloud service or self-hosted and accessed by VPN).
- Because we can. Yeah, we geeks tend to treat this argument seriously :).
Whatever the reason to use fully fledged database to store Log4OM logs, you need to follow the below steps to set it up. In this tutorial I will be using MariaDB, but it will be virtually the same for MySQL.
Prerequisites
You need to have MariaDB or MySQL database engine installed. Database engine installation is out of scope of this document, however in its basic form it is a simple task. Most Linux distributions come with MariaDB / MySQL packages ready to install, on MaxOS X you can use Homebrew or MacPorts and on Microsoft Windows you need to download and install MSI package for x64 / x86 platforms (most PCs are x64 nowadays).
You will also need to know:
- Hostname or IP address of MariaDB / MySQL database server (if you use MariaDB as public cloud service you may need to contact your provider to get it)
- TCP port number of MariaDB / MySQL server (typically 3306)
- Database admin user credentials (by default the username is root, you need to know the password)
- MariaDB / MySQL client to connect to your database (needed for password change and/or troubleshooting)
- Telnet client (or other TCP connection checking tool; needed for troubleshooting only)
Database creation and connection
Log4OM has you covered and has embedded mechanisms to create a database for you.
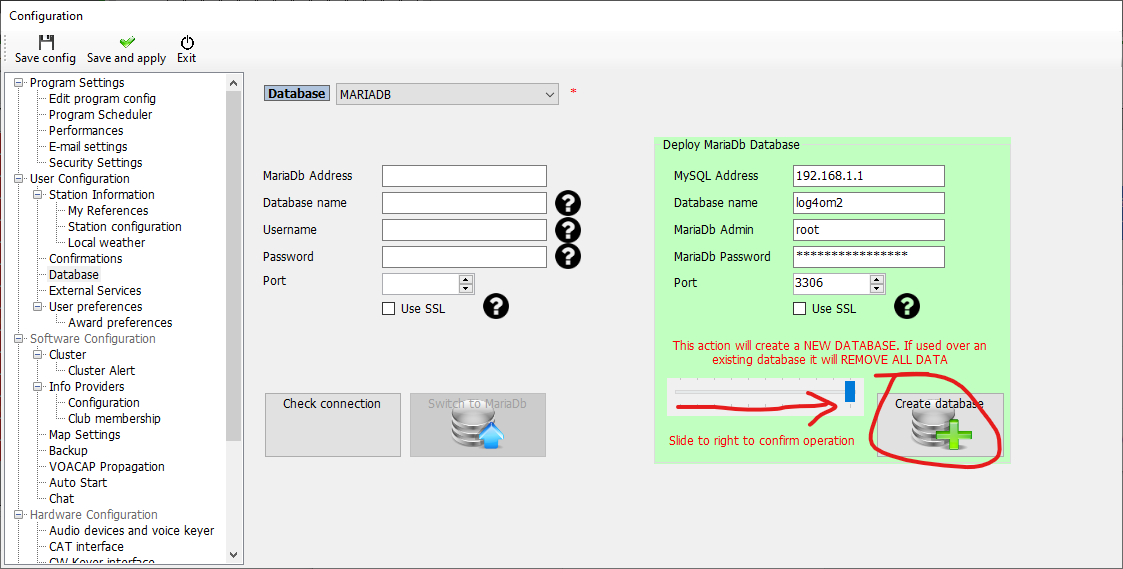
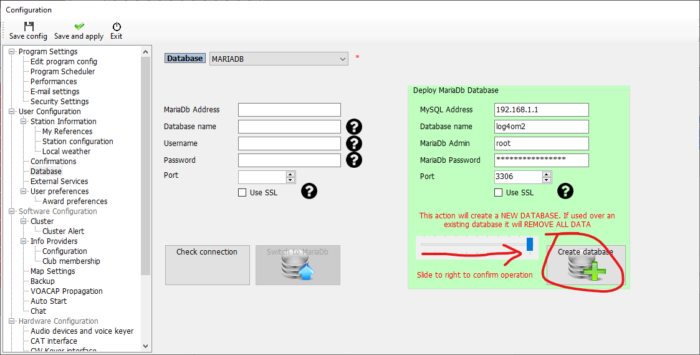
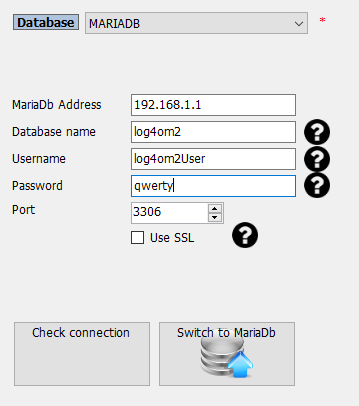
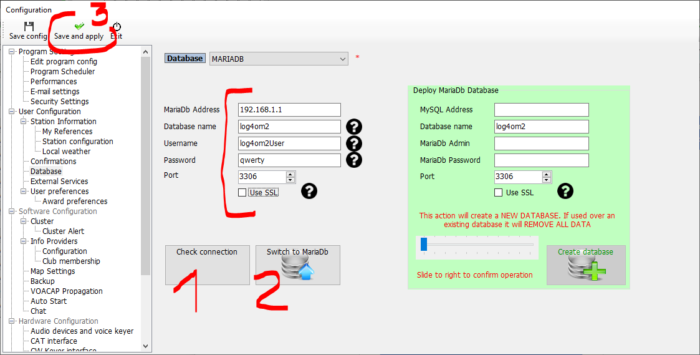
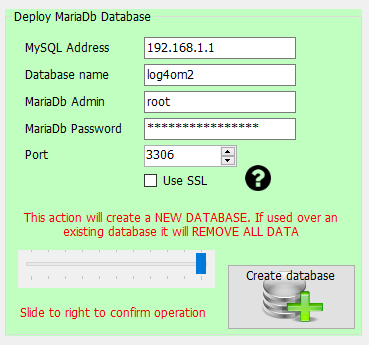
Go to Menu -> Program Configuration -> User Configuration -> Database and you should be able to see window like below, with quite self explanatory fields that needs to be filled in:
- MySQL / MariaDB Address: can be IP address or hostname of database server, here 192.168.1.1 as an example
- Database name: database to be created, default to log4om2
- MariaDB Admin: database user able to create new database, default to root
- MariaDB Password: password for admin root user
- Port: TCP port of database server, default to 3306
- Use SSL: tick if your server is using SSL/TSL encryption for connections (most modern packages have SSL pre-configured, so it should be fine and even recommended to check it in)
Once all fields are filled-in move the slider to the right and press “Create database” button. Please note that that will create new database of given name, and will overwrite all data in previous database, if a database of the same name would exist.
If everything will go as expected the below message should appear:
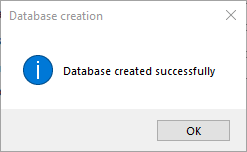
following by this screen:
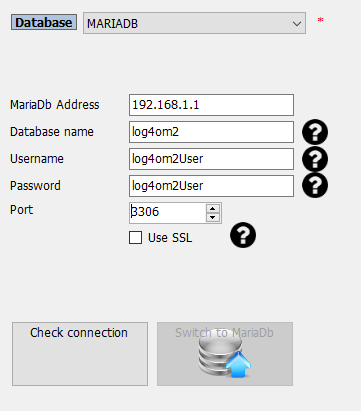
At this stage you can press “Check connection” to finally confirm that everything works correctly. If so, button “Switch to MariaDB” button should become not-greyed.
Press “Switch to MariaDB” button to activate new database as a QSO log storage in Log4OM. Your previous QSO log is preserved though, so you can always switch back and forth (particularly useful to export precious data and import it into new database – see below about data migration).
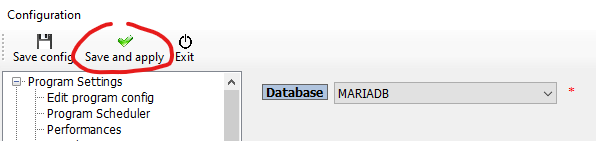
Do not forget to save all changes by pressing “Save and apply” to save all settings and close configuration window.
At this point Log4OM is ready to use MariaDB or MySQL database as its QSO log storage. Actually also database user named “log4om2User” was created, with weak default password – the same as username. This is very wrong practice to use such a weak password, so we will change in a next step.
Default password change
As mentioned before default password created by Log4OM is very week and it should be changed. To do that you need to connect to MariaDB database using its native client, named simply mariadb (mysql for MySQL database). In Windows you need to open the Command Line (CMD), switch do the folder where MariaDB was installed (adding \bin) and execute the following command:
C:\>cd "C:\Program Files\MariaDB 11.7\bin"
C:\Program Files\MariaDB 11.7\bin>mariadb --host 192.168.1.1 --port 3306 --user root --password
Enter password: **************
The command on Linux and MacOS is the same, just you probably will not need to change directory first. Windows users, please note that my installation folder was C:\Program Files\MariaDB 11.7\bin, as this is the version I was using at the time of writing the article. Yours may vary, so just check it out and correct accordingly.
If the connection will be successful you will be prompted for a password. Once successfully authenticated you will see screen similar to the below:
Welcome to the MariaDB monitor.  Commands end with ; or \g.
Your MariaDB connection id is 20
Server version: 11.7.2-MariaDB-ubu2404 mariadb.org binary distribution

Copyright (c) 2000, 2018, Oracle, MariaDB Corporation Ab and others.

Type 'help;' or '\h' for help. Type '\c' to clear the current input statement.

MariaDB [(none)]>
Now you can issue SQL commands to the database (please refer to the below Troubleshooting section if your connection to database engine was unsuccessful).
To change the password to something more secure, issue the following command:
MariaDB [(none)]> SET PASSWORD FOR 'log4om2User'@'%' = PASSWORD('qwerty');
Query OK, 0 rows affected (0.005 sec)
As above, the answer should be “Query OK, 0 rows affected”.
In this example I used password qwerty which obviously should be changed to something secure. Much more secure.
Note: if your database and Log4OM resides on the same computer, you may need to change log4om2User@localhost password as well.
Now you come back to Log4OM settings and change database logon credentials (password) to whatever you have just set as a new password:
The very final step is to press “Check connection” to confirm that everything still works correctly followed by “Switch to MariaDB”. Again, do not forget to save all changes by pressing “Save and apply” in the main configuration window.
If you want to exit mariadb client you must issue QUIT command.
Please keep reading to find how to migrate QSO log from previous storage (SQLite), how to backup your MariaDB / MySQL database or how to troubleshoot database creation in case of any problems encountered in previous steps.
Existing SQL log (data) migration
It is very likely that you started your Log4OM QSO log with SQLite. This is fine. It is very easy to migrate your existing SQLite database into your new, shiny MariaDB / MySQL instance.
Note that your QSO log Recent QSO’s (F7) tab in Log4OM is now empty:
This is normal, as we have just created and switched to brand new (and empty) MariaDB database. We need to switch it back to SQLite, where all previous information resides.
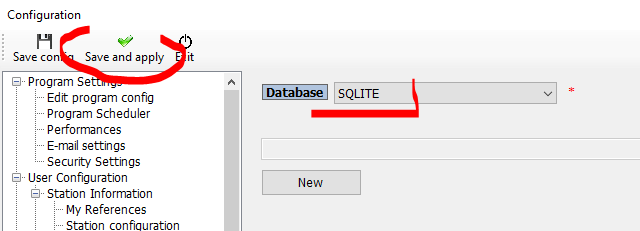
Go to Menu -> Settings -> Program Configuration -> User Configuration -> Database. Select SQLite, as it was before. Click “Save and apply”:
Note that Log4OM log under Recent QSO’s (F7) tab has now all your previous QSO’s back.
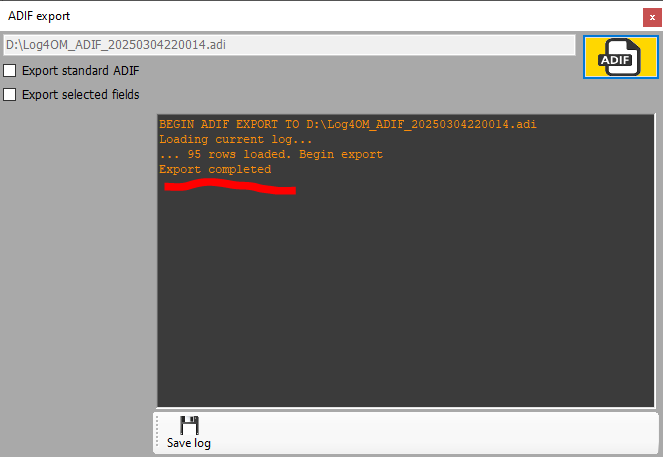
Select Menu -> File -> Export ADIF. The below windows will appear. Do not check “Export standard ADIF” nor “Export selected fields. Click “ADIF” on yellow background:

Choose any folder to save your export ADI file. Desktop will be just fine. This ADI file will contain all QSO entries from SQLite database. Export may take some time if your SQL log is large. Once export is completed it will look like this:
Now switch back to your newly created MariaDB / MySQL database engine. Open database configuration dialogue again. Enter all required database information (address, name, username, password, port, use SSL if needed). Click “Check connection”, followed by “Switch to MariaDB” and “Save and apply”:
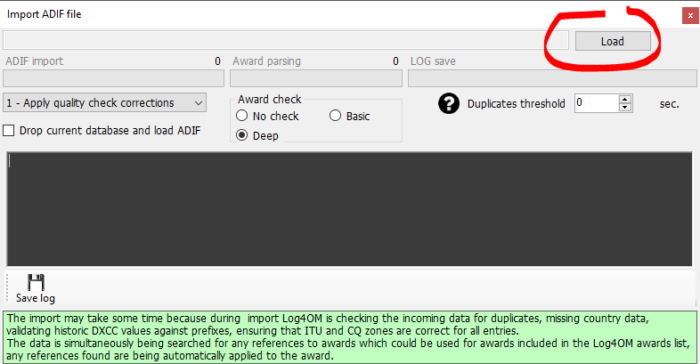
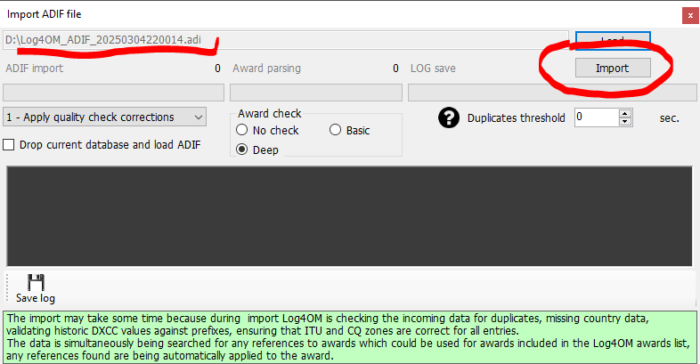
Log4OM log under Recent QSO’s (F7) tab is empty again. We will now import all your logs into new MariaDB / MySQL database. Go to Menu -> File -> Import ADIF. The below windows will appear. Click “Load” and select previously exported ADI file, then click “Import” to begin import process:
The import may take several minutes, depending on your log. Be patient. At the end it should look similar to this:
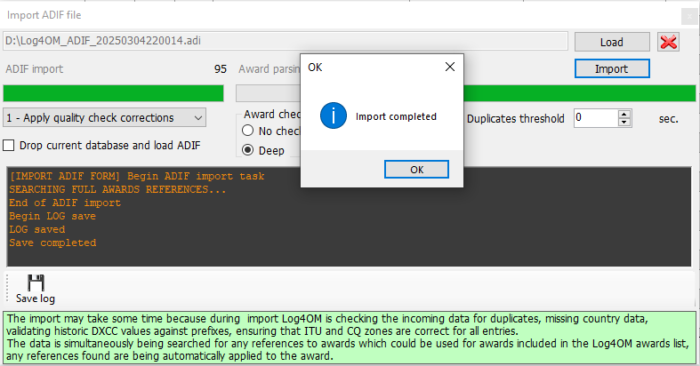
You may want to save and review import log. But as this is straight forward export / import there should be no errors.
Now it is the time to start enjoying your new MariaDB / MySQL database with all history in it :).
Database backup
Real men do not use backups. Well, if this is your approach you may skip this section. All the rest please feel free to keep reading :).
Good news is that MariaDB / MySQL backups are very easy to do. As with database client, there is a dedicated command line tool for it. Here is an example for Windows, but of course it will be the same under Linux / MacOS:
C:\>cd "C:\Program Files\MariaDB 11.7\bin"
C:\Program Files\MariaDB 11.7\bin>mariadb-dump --opt --host=192.168.1.1 --port=3306 --user=root --password log4om2 > D:\log4om2_backup.sql
Enter password: ****************

C:\Program Files\MariaDB 11.7\bin>
The above command will connect to database named log4om2 on host 192.168.1.1 and TCP port 3306, using root superuser credentials (you need to provide root password when prompted). After running mariadb-dump it seems like nothing has happened, but the database was backed-up to a file, in my case D:\log4om2_backup.sql.
(please note that all mariadb-dump –opt … >D:\log4om2_backup.sql command is a single command, one line)
This is how the backup file should look like when opened with any text editor (like Notepad in case of Windows):
/*M!999999\- enable the sandbox mode */
-- MariaDB dump 10.19-11.7.2-MariaDB, for Win64 (AMD64)
--
-- Host: 192.168.1.1    Database: log4om2
-- ------------------------------------------------------
-- Server version	11.7.2-MariaDB-ubu2404

/*!40101 SET @OLD_CHARACTER_SET_CLIENT=@@CHARACTER_SET_CLIENT */;
/*!40101 SET @OLD_CHARACTER_SET_RESULTS=@@CHARACTER_SET_RESULTS */;
/*!40101 SET @OLD_COLLATION_CONNECTION=@@COLLATION_CONNECTION */;
/*!40101 SET NAMES utf8mb4 */;
/*!40103 SET @OLD_TIME_ZONE=@@TIME_ZONE */;
/*!40103 SET TIME_ZONE='+00:00' */;
/*!40014 SET @OLD_UNIQUE_CHECKS=@@UNIQUE_CHECKS, UNIQUE_CHECKS=0 */;
/*!40014 SET @OLD_FOREIGN_KEY_CHECKS=@@FOREIGN_KEY_CHECKS, FOREIGN_KEY_CHECKS=0 */;
/*!40101 SET @OLD_SQL_MODE=@@SQL_MODE, SQL_MODE='NO_AUTO_VALUE_ON_ZERO' */;
/*M!100616 SET @OLD_NOTE_VERBOSITY=@@NOTE_VERBOSITY, NOTE_VERBOSITY=0 */;

... MANY MORE LINES HERE ...
Compress (zip) this file if you want and keep it in a safe location, preferably other than database server.
You may want to automate mariadb-dump process so it runs automatically, i.e. on daily basics. But this is out of scope of this article.
Troubleshooting
Network connectivity
In case Log4OM is unable to create MariaDB / MySQL database the very first thing to check is network connectivity. Database server in its default configuration is listening on TCP port 3306. If there is no connectivity to this port from computer running Log4OM to the database server, Log4OM will be unable to co issue any commands to the database.
The easiest way to check connectivity is to use Telnet and try to connect to server hostname or IP address on port 3306 (or other if your database is using non-standard configuration).
Telnet is a build-in tool in any Linux and MacOS X. It is not standard in Windows 10/11 though. It must be turned on via “Windows Features” of Windows Control Panel (search Internet for “enable telnet on windows 10 or 11” if in doubt).
Assuming your MariaDB / MySQL database server IP is 192.168.1.1 the command to run on the computer running Log4OM should be (you should run it from the command line):
telnet 192.168.1.1 3306In case of success you will get message similar to the below:
Connected to 192.168.1.1.
Escape character is '^]'.
Z
11.7.2-MariaDB-ubu2404.pjF[wev?=A#'8'V^UnLojmysql_native_passwordConnection closed by foreign host.
Otherwise telnet will not be able to connect:
Connecting To 192.168.1.1…Could not open connection to the host, on port 3306: Connect failedIf you get Connection failed or similar message there is no chance for Log4OM to connect to the database.
There are number of reasons why you may be getting Connection failed messages:
- MariaDB / MySQL is not listening on a host (database server) and port you are trying to connect
- There is no routing between Log4OM computer and the database server
- There are firewall rules limiting network traffic (network firewall on a way, local firewall on database server or Log4OM computer, or both)
- Many other things
Whatever the reason you MUST sort it out before trying anything else. Telnet test must be successful. It makes no sense to try any other solutions before correcting network connectivity.
Remote root access
Some databases are configured in a way, that root access is allowed only locally, not from remote computers. In that case you need to connect to the database locally and enable remote root access.
To check if root can connect from any remote computers, you need to connect to the database (as described above, using mariadb / mysql client). Once connected this command will show what root can
MariaDB [(none)]> SELECT user,host FROM mysql.user WHERE user='root';
+------+-----------+
| User | Host      |
+------+-----------+
| root | %         |   <--- this row must exist! it allows root to logon from any host, not only from localhost
| root | localhost |
+------+-----------+
2 rows in set (0.005 sec)
If the only entry corresponding to root account is the one with “localhost” you need to allow remote access. This is done by adding root@% entry into mysql.user table (sign “%” means “all hosts”, including remote).
MariaDB [(none)]> GRANT ALL PRIVILEGES ON *.* TO 'root'@'%' IDENTIFIED BY 'qwerty' WITH GRANT OPTION;
MariaDB [(none)]> FLUSH PRIVILEGES;
Again, replace “qwerty” with some strong password. This is the password you can then use in the “Deploy MariaDB Database” form:
Other issues
There are many other potential problems preventing Log4OM from deploying and using external MariaDB / MySQL database. This article is not intended to be a comprehensive database troubleshooting guide. Good practice is to focus on one thing at a time, sort out basic things first (like network connectivity), analyze logs, increase debug levels as needed, etc.
Successful deployment
The below commands and outputs from mariadb / mysql client should give you an idea how properly deployed Log4OM database could look like:
MariaDB [(none)]> SHOW DATABASES;
+--------------------+
| Database           |
+--------------------+
| information_schema |
| log4om2            |
| mysql              |
| performance_schema |
| sys                |
+--------------------+
6 rows in set (0.005 sec)

MariaDB [(none)]> SELECT user,host FROM mysql.user;
+-------------+-----------+
| User        | Host      |
+-------------+-----------+
| log4om2User | %         |
| root        | %         |
| healthcheck | 127.0.0.1 |
| healthcheck | ::1       |
| healthcheck | localhost |
| log4om2User | localhost |
| mariadb.sys | localhost |
| root        | localhost |
+-------------+-----------+
9 rows in set (0.014 sec)

MariaDB [(none)]> SHOW GRANTS FOR log4om2User;
+------------------------------------------------------------------------------------------------------------+
| Grants for log4om2User@%                                                                                   |
+------------------------------------------------------------------------------------------------------------+
| GRANT USAGE ON *.* TO `log4om2User`@`%` IDENTIFIED BY PASSWORD '*15C156E72F0B7B7904E71D36823F99964EDF138F' |
| GRANT SELECT, INSERT, UPDATE, DELETE, INDEX ON `log4om2`.`log` TO `log4om2User`@`%`                        |
| GRANT SELECT, INSERT, UPDATE, DELETE, INDEX ON `log4om2`.`informations` TO `log4om2User`@`%`               |
+------------------------------------------------------------------------------------------------------------+
3 rows in set (0.003 sec)
Final word
I hope this article will help you setting up MariaDB or MySQL as a storage for Log4OM QSO log. At the moment of writing this article I was using Log4OM wersion 2.35.1.9 and MariaDB 11.7.2. Some things may change with time, but I hope I gave you a general idea how to proceed, even if some changes will actually occur.
Please note all the above comes with no warranty. Existing SQLite database should not be altered at all during the migration procedure. However it is a good practice to execute proper backup before starting any work (proper meaning as stated in Log4OM User Manual).
If you would any questions please leave a comment below. I will try to answer all comments.